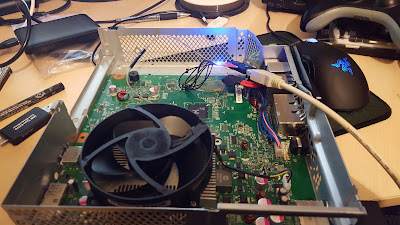
I know, yet another 360, sorry but its what I have at the moment to mess and learn about.
This model is a slim but has a different approach than the Trinity I did. The NAND cannot be
downloaded using a NAND-X programmer. Some people make their own SD Card reader using a split open usb stick or butchered SD Card, apparently the standalone SD Card readers widely available are less than reliable in this process.
Motherboard: Corona 4GB
Here is a look at the Pinheader the SD Card wiring needs soldered to, Its really small.
Well the connections are strip like so close together its hard not to join two close points.
I took the easy way out and instead of going full on McGyver and making one I ordered a tool from Weekend Modder.com. He has decent tutorials on Youtube too so why make it any harder. Ive uploaded Team Xecuter`s pic of a fashioned SD card reader and a picture of my SD Card after i installed the wires.
I really didnt like the look of the above, Weekend Modder is in USA but I got the SD Tool just over 7 days.
This card comes with resistors already built onto it . The grey wire Ive used goes to a Crystal on the mobo, it allows for READ/WRITE function but needs to be disabled during the install at different times. I fitted a quick release connector for this. The install was tricky as I said before its easy to bridge short connections.
Not much room on the pads once installed. Time to fire up JRunner and try reading the NAND. The quick connector must be attached to the crystal and power cable plugged in but console OFF..
I got a flashing blue light on the SD Tool and nothing on my USB adaptor. Some advise to have a few variations of USB Card reader as not only poor connection to the SD Tool can be a problem but USB 3.0 vs 2.0 etc. After re-soldering to the points for a third time, yes if anything I`m persistent, I got a solid blue light on both SD Tool and USB adaptor, windows also bing bonged asking to format my new found device.
JRunner read the NAND perfectly so I backed it up incase I had any problems later.
I now installed the ACE V3 Glitch Chip. A few different points than the Trinity including two underneath.
As usual I replaced the thermal paste on the heat -sink and combined CPU/GPU.
Fortunately I didn`t need to fit a PostFix adaptor which is another headache with many tutorials and micro soldering.
I recovered the Network IP address using the Xell ECC i loaded to the NAND. I don`t know why but I had to de-install the SD Tool in order for the machine to boot, usually just breaking the crystal quick connection allows for a boot, no such luck. I did get a panic on as I needed Xell to boot to give me that CPU key so was relieved it did.
I now reinstalled the SD-Tool, lots of flux and my head mounted magnifying tool gave me a better job of it. I created an new Build on JRunner with the CPU key and wrote the new Nand, all seemed well!
The Ace Glitch chip worked flawless, machine booted into the Microsoft Dash, jobs a GOOD`N as they say here. Not too bad an install but with a few small headaches, i`m sure i`ll get quicker and more reliable with practice.
I had to utilize the kitchen workbench during install, just some advice to anyone else,
Its not worth the aggro, the bollocking so near to meal times and you have soiled the place with your JUNK!
I did a more professional job on my SD Tool as the wiring did give me issues, not only on the board but on the cards solder points. I had some Dupont cable so made something that will hopefully be better for future use.
I don`t have a spare decent size hard drive to put in this at the moment but I managed to install Aurora dashboard ready and adjusted the fan speed to combat any overheating in the future.
MERRY XMAS.....


No comments:
Post a Comment